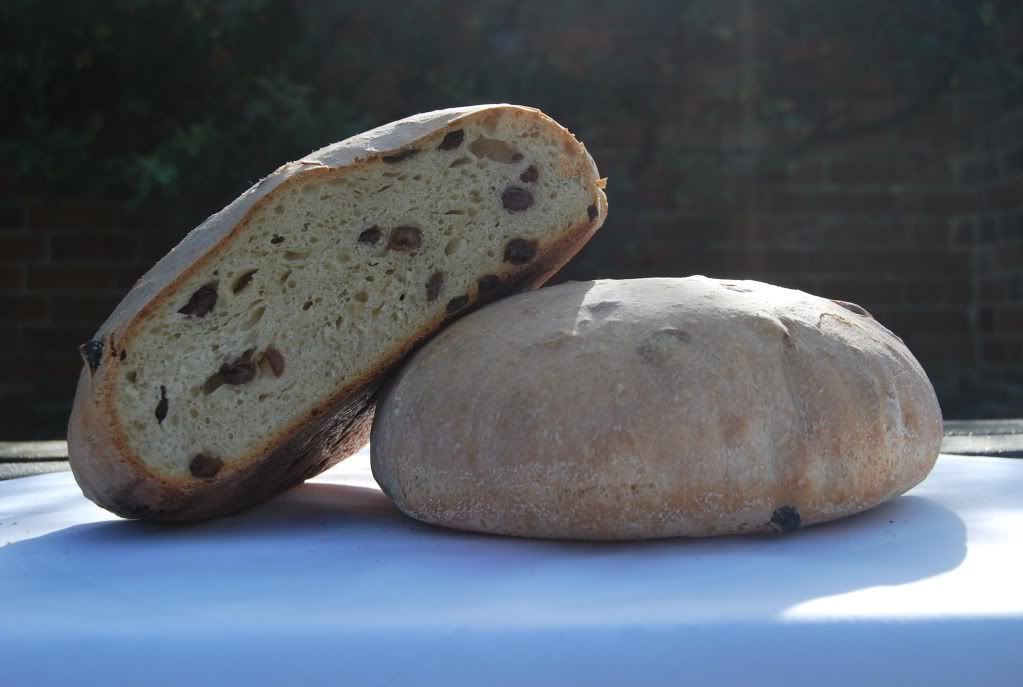
Thursday 9 December 2010

Sentimental farewell

Although I’ve been procrastinating and putting off the inevitable, the time has finally arrived for me to bid farewell to The Pot Kiln, and consequently my online baking alias. The last few months have been a formative time for me, from the disastrous courgette bread of my first day, to customers asking to buy individual loaves to take away; from balking at the deer carcasses staring blankly out of the fridge, to proudly purchasing my own boning knife. Before I began I had no style of my own to speak of, but out of the garden and the expansive countryside and the response from the restaurant, I now have a much clearer idea. In the surroundings of The Pot Kiln I have been on a continuous learning curve, not from having chefs breathing critically over my shoulder, but from being given freedom to experiment. As far as my baking is concerned, the mere fact that I’ve been able to practice the process everyday will I know be invaluable. I am pleased to say that the task never remotely strayed into chore-territory. Bounding in each morning in anticipation of how my tea towel-shrouded sourdough has fared overnight, or standing by the glass-fronted oven watching it rise majestically in the first blasts of heat, is something I will miss greatly.
I would like to thank all the staff at the Pot Kiln for making my time there such a positive experience: in particular to Katie and Mike for taking a gamble and employing a relative novice. Thanks also to head chef Phil, for not only allowing me access to his magical camera, but for not screaming too loudly as I danced around five minutes before service, frantically trying to photograph bread destined for the board. I know that whatever I do now I have to work with food. I will continue to have flour on my clothes and dough under my fingernails. I will be watching the seasons and the hedgerows. I will be writing ideas in my shark-patterned notebook and taking cookbooks on train journeys.
This is the Pot Kiln Baker, signing off.

Pearl Barley and Rye Baguettes


Makes 4

Pearl barley is one of my favourite winter ingredients, evoking heartening images of steaming stews with dumpling clouds. It is also a frugal way to add body to a loaf, which is why the initial cooking stage in this recipe may seem optimistic: I like the individual milky grains to still be identifiable. The high proportion of rye ensures this is a dense, robust loaf, and makes kneading less crucial as the gluten content is reduced. I would want this with a coarse terrine, or buttered with slivers of smoked salmon.

500ml water
200g pearl barley
200ml soaking liquid of your choice (orange juice, apple juice, beer, wine etc.)

1kg rye flour
750g strong white flour
250g wholemeal flour
6 tsp sea salt
400g rye leaven
1 ltr water at room temperature

To cook the pearl barley, place it with the water in a pan and bring to the boil. Simmer for around 25 minutes until cooked through and all the liquid has been absorbed. Pour over the soaking liquid (I used white wine as there was some lying around), and leave until cool, or overnight if possible. When the barley is ready, combine the flours and salt in a large bowl. Whisk together the leaven, room temperature water, barley grains and soaking liquor. Pour this mixture onto the dry ingredients and roughly combine. Leave for 10 minutes. Turn the mix out onto a lightly oiled surface and knead briefly until it comes together as dough. Cover and leave for 10 minutes, then knead again briefly. Repeat. Cover and leave for half an hour, then knead again. Cover and leave for a couple of hours. Because of the high proportion of rye in this dough, it will be fairly difficult to knead, but should eventually become smoother in appearance. After a couple of hours, divide the dough into four equal pieces. On a sparsely floured surface, shape each one into a ball. Flatten slightly, fold the top edge down to the centre, and the bottom edge up to meet it. Roll into a long, even cylinders around 2 inches in diameter. Now take a large roasting tin and two heavily floured tea towels. Lay one on the base of the tin, with the edge of the towel curling up the side. Nestle one baguette on the towel along the length of the tin, and pull up the tea towel on the other side so it is surrounded, except on top. Place another loaf the other side of this crease, and pull the tea towel up snugly on the other side. Repeat with the other towel and two loaves, so it should look like the photograph below. This means as they prove overnight they are doing so up against each other which allows them to keep their shape and expand evenly. Place a last damp tea towel over the top, and tuck them away for the night.


In the morning, one by one carefully turn out the baguettes onto semolina dusted trays. Slash with a sharp knife and leave for 10 minutes. Place in a preheated oven at 200˚c for around 40 to 50 minutes. Leave to cool before slicing.

Hazelnut and Vanilla Biscotti


Makes 100

I’m going to go out on a limb and declare this recipe foolproof. It’s also very adaptable; feel free to change the nuts, add chocolate or orange zest. Biscotti has so much in its favour: easy to make in bulk, it contains no added fat and retains its crunch for weeks. If this quantity seems a little daunting or unnecessary, I’ve found the dough is quite happy to sit in the fridge for up to 3 days, to be baked off when required. Just handle the cold dough with wet hands to make life easier. Needless to say, these are the perfect accompaniment to coffee, either after or instead of dessert.

500g plain flour
500g golden caster sugar
500g whole hazelnuts
1tbsp baking powder
2 tsp vanilla extract
5 eggs, beaten

Combine the dry ingredients in a large bowl. Beat the vanilla into the eggs, and add to the dry mix. Stir, either with spoon or hand, until the mixture forms a dough. It may seem too dry, but resist the temptation to add any extra liquid; all of a sudden it will come together. Divide the mixture into six, and on a lightly floured surface roll each piece into a cylinder of 1 inch diameter. Place in pairs on parchment-lined baking trays, very well spaced out as they will spread. Bake at 180˚c for around 15 minutes, until and even golden brown. Remove from the oven and reduce the temperature to 100˚c. Leave the dough splodges to cool and firm up for at least another 15 minutes before transferring to a chopping board. With a serrated knife, cut slices on the diagonal of around ½ a cm, and place the slices back on to the trays, cut side up. Return to the oven for around an hour, until the biscuits are crisp and deep brown. If you feel the inclination, you can turn the biscotti over half way through this cooking time, but it is not essential.

Wednesday 24 November 2010

Malted Milk Loaf


It is an unfortunate truth universally acknowledged that fat makes things taste better, and bread is no exception to this rule. Enriched, buttery breads, with their soft crust and tight crumb, are always popular in the restaurant and are apparently irresistible to the front of house staff, too. A simple milk loaf is hard to beat, and I’d choose it over brioche any time, but I also like the comforting ovaltiney note the malt extract provides in this bread. The overall effect reminds me of those rectangular biscuits adorned with grazing cows and pastoral landscapes my grandparents would always have a supply of.

This week in the kitchen I have been finding homes for my store cupboard exploits.
The rosehip syrup was reduced, made into ice cream and served with candied almonds and almond butter biscuits, although I have to say a little may have been misplaced and found itself in a rum cocktail or two. The chestnut jam now accompanies the dark chocolate brownie with clotted cream. I have also been making Swedish spiced biscuits, or pepparkakor, not only because I thought they would work well with the panna cotta and roasted plums, but also because the very smell of them gets me childishly excited about Christmas.

Malted Milk Loaf
Makes 1 loaf

For the loaf:
500g strong white flour
1 ½ tsp salt
15g fresh yeast, or 7g dried
300ml luke warm whole milk
1 tbsp malt extract
50g soft butter

For the glaze:
1 egg yolk
50 ml luke warm whole milk
1 tsp malt extract

To make the loaf, mix the flour and salt in a large bowl. Whisk together the milk, malt extract and yeast until thoroughly combined. Pour the wet ingredients into the dry and mix by hand into a rough dough. Leave for 5 minutes. Add the butter to the bowl, and using both hands, repeatedly squidge the butter and dough through your fingers, like a child playing with plastercine. It is as fun as it sounds and will only take a few moments for the butter to evenly disperse. Leave for 10 minutes. Knead on a lightly oiled work surface for up to five minutes, until the dough is smooth and shiny. Return to the bowl, cover and leave to prove in a warmish place (25◦c) for an hour or until doubled in size. Knock back the dough, again on an oiled surface, and shape into a ball. Place on a semolina-dusted tray, and leave to prove again in a warm place for another 45 minutes.
To make the glaze, dissolve the malt extract in the milk, then stir in the egg yolk. When your dough is ready, brush the glaze evenly all over and slash the loaf in whatever way you fancy. Bake at 200◦c for around 50 minutes, turning the oven down to 180◦c if the crust is becoming too dark. Leave to cool before slicing. Because of the fat content of the loaf it will still be fine as it is the next day, and wonderful toasted in the days after that.

Tuesday 16 November 2010

Nettle Sourdough


Makes 1 loaf

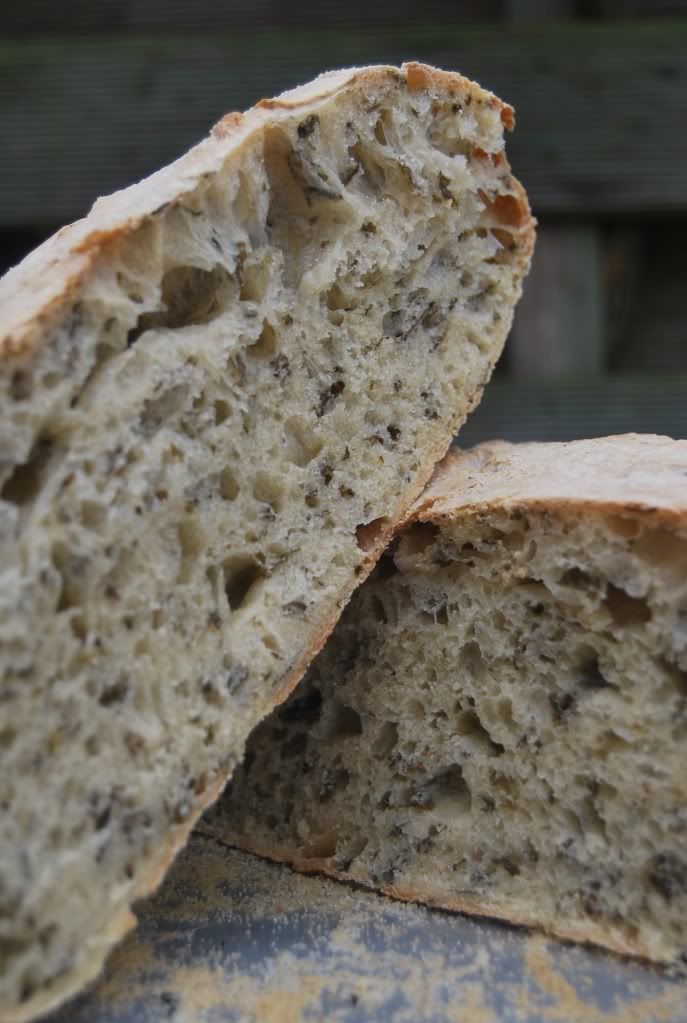
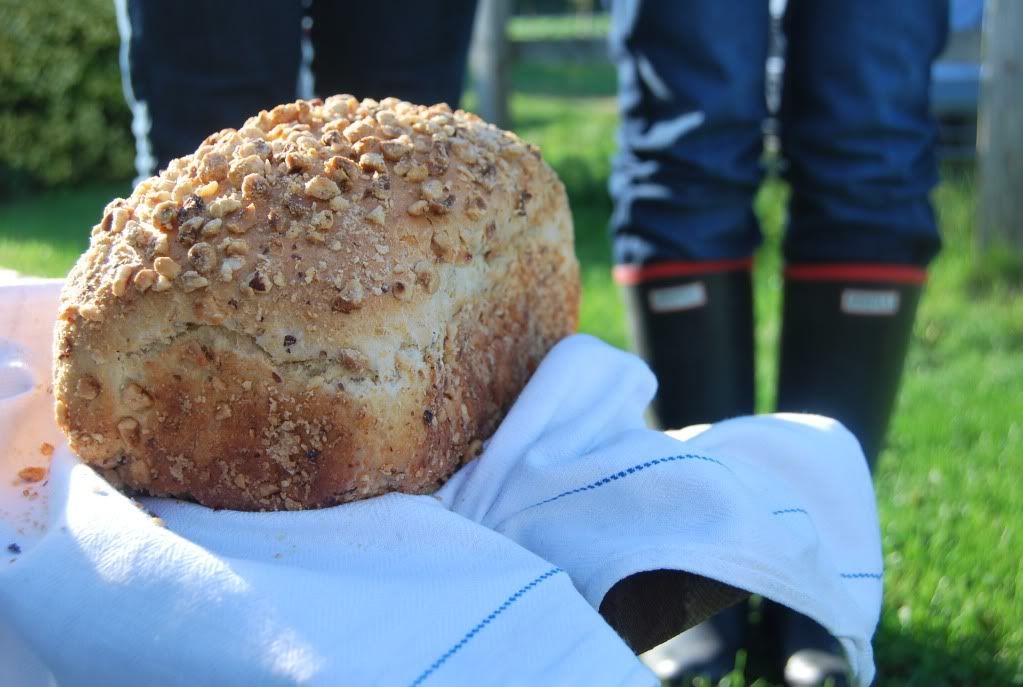
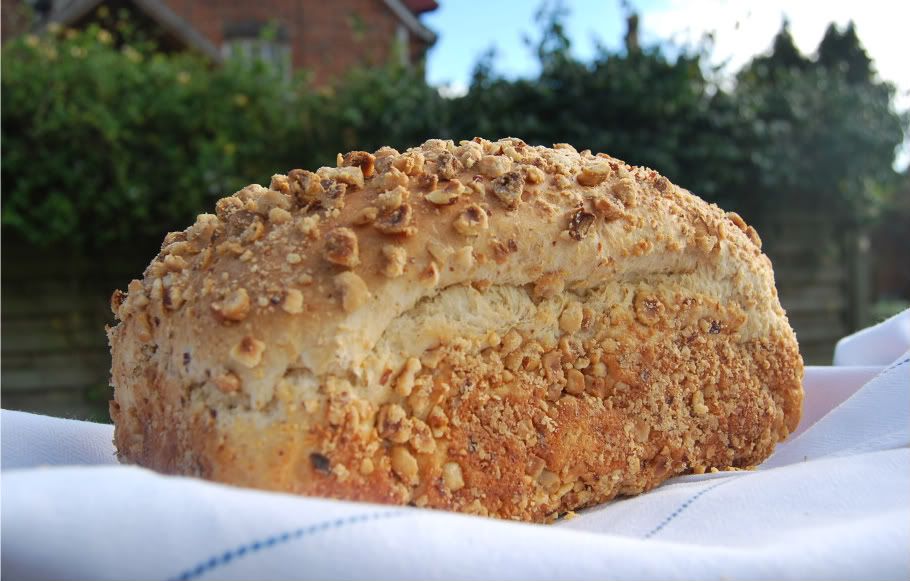
Another science experiment from me this week. I’ve been gripped by the idea of making a nettle loaf since my Auntie Sue came across a recipe in one of her ancient Swedish cook books. However, I wanted more than to just add them to the loaf mix: I wanted to see if I could cultivate a leaven using nettles as my source of natural yeast. Remembering sucking the sweet nectar out of the white flowers as a child, and finding them still rampant in the November hedgerows, I used three heads of flowering nettles in place of raisins in the fermentation process. It sounds slightly gimmicky, but has actually turned out to be a very healthy sourdough.

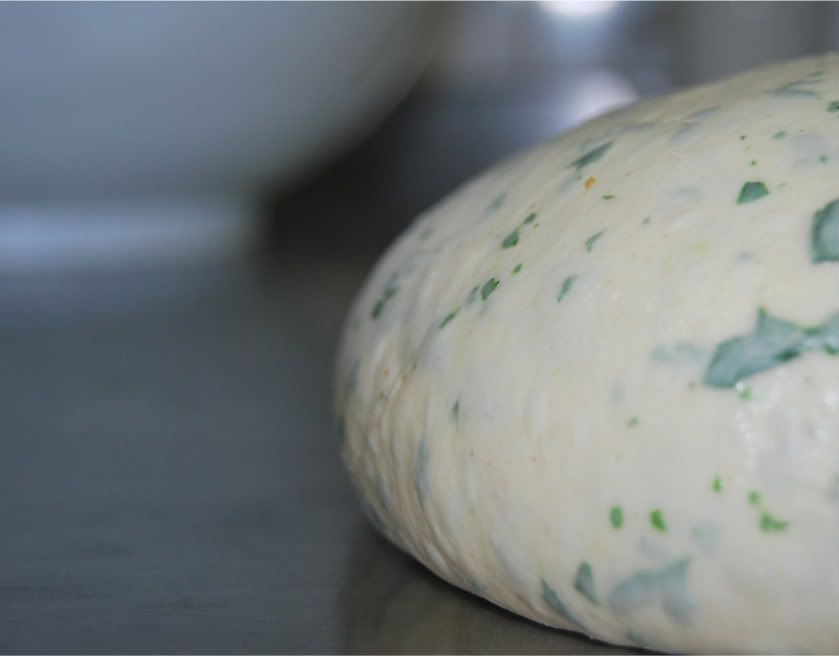
Nettles are free, nutritious, and readily available. This was my first edible encounter with them and I have to say I’m a convert. I found the best way to pick them was with a pair of kitchen scissors and tongs at the ready. For this loaf a lunch-box size Tupperware full should be enough. After picking, blanch in boiling water for no more than a minute, then immerse straight into iced water. Drain, pull the leaves from the stem (they should come away very easily), and roughly chop. Although it sounds laborious, the whole process from picking to chopping only took 20 minutes or so. Granted, it’s not the best time of year for nettles at the moment (spring is perfect when they are young and lush), but I couldn’t wait. Try and locate the more vibrant, flatter ones as opposed to the duller, woodier leaves.

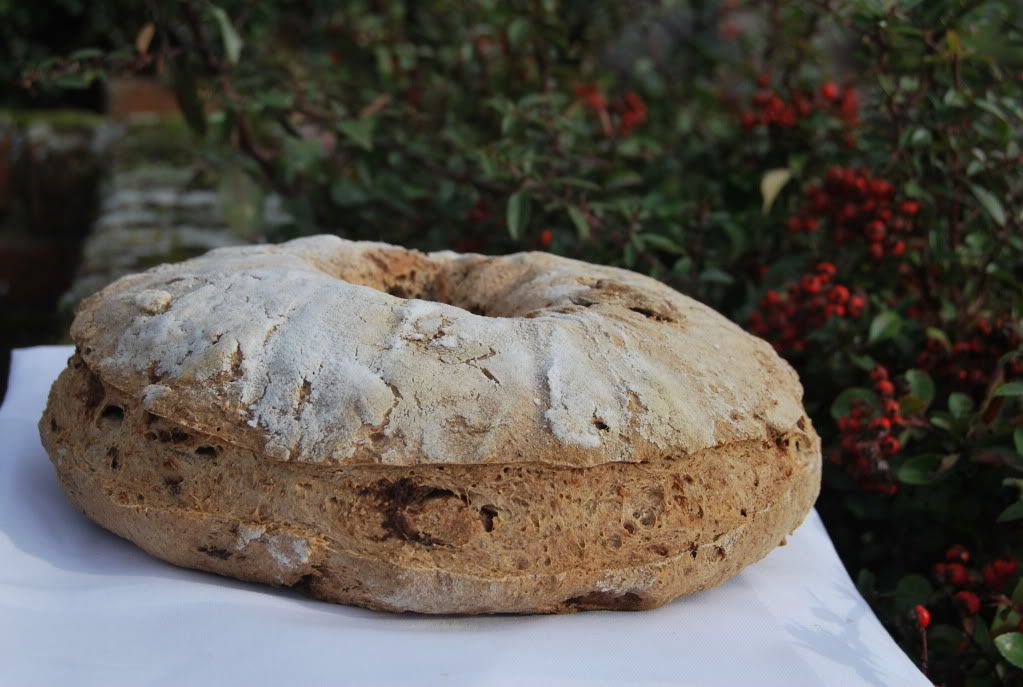
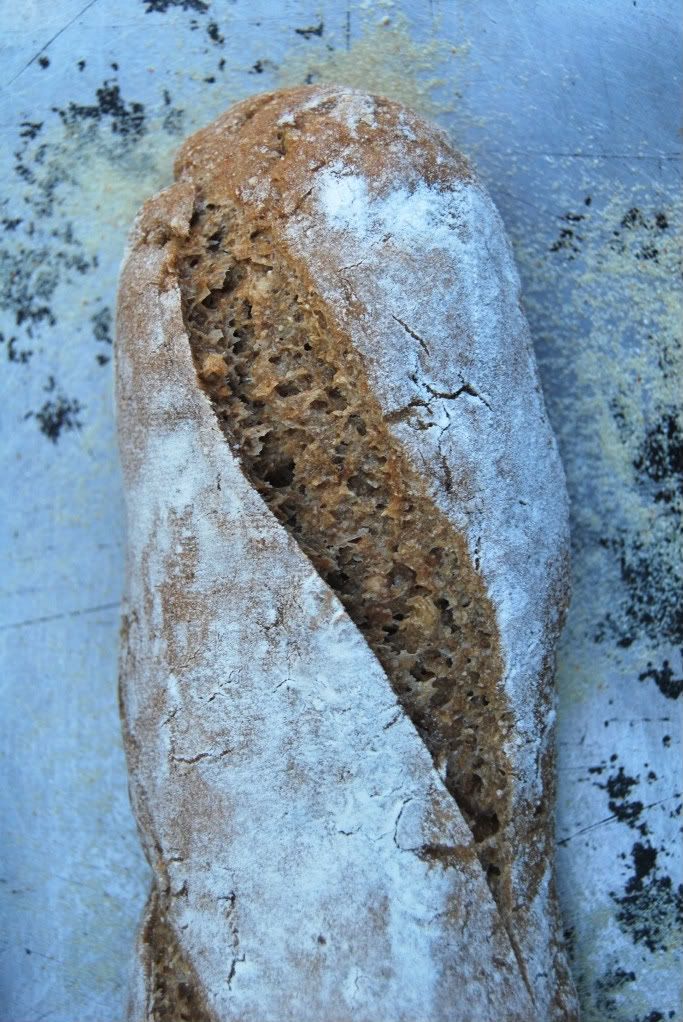
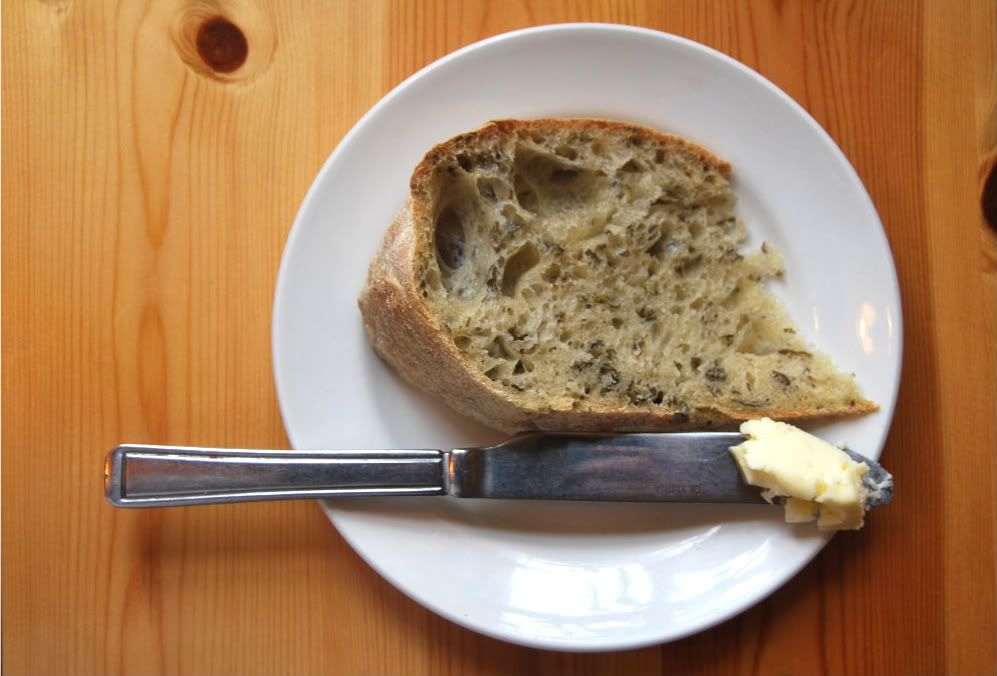
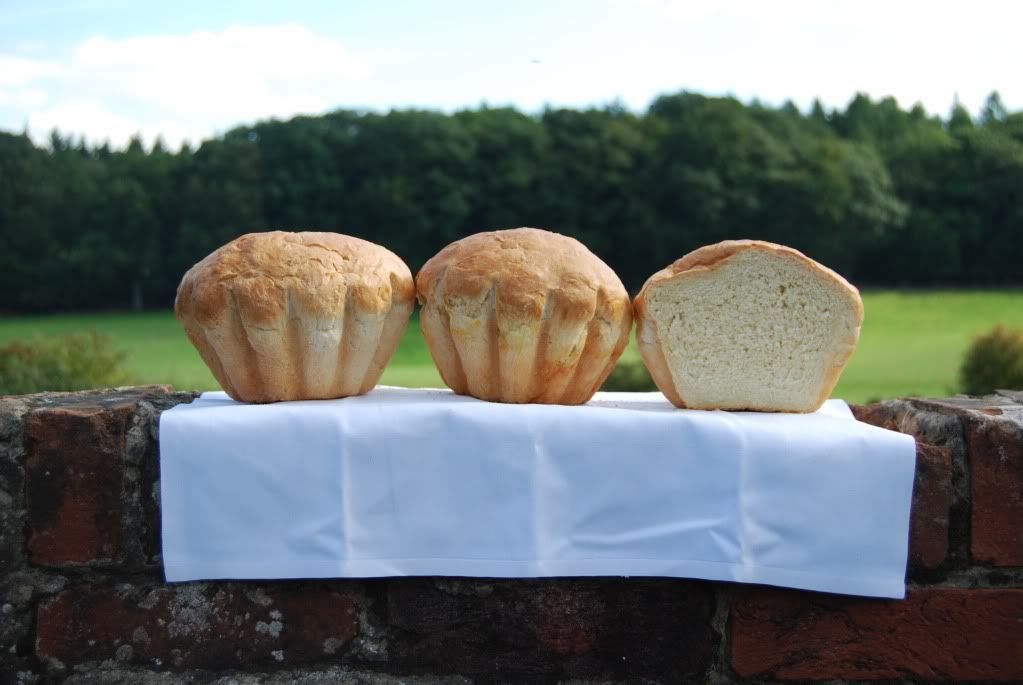
The nettles give the loaf a pleasing irony depth, which compliments the sour tang of the crust. I have used only white wheat flour here to act as a more neutral backdrop to the plant, but having tasted the loaf, I think a little rye would work well too. It proved extremely popular with our customers, so no doubt I will working regular nettling expeditions into my routine from now on.

The Leaven
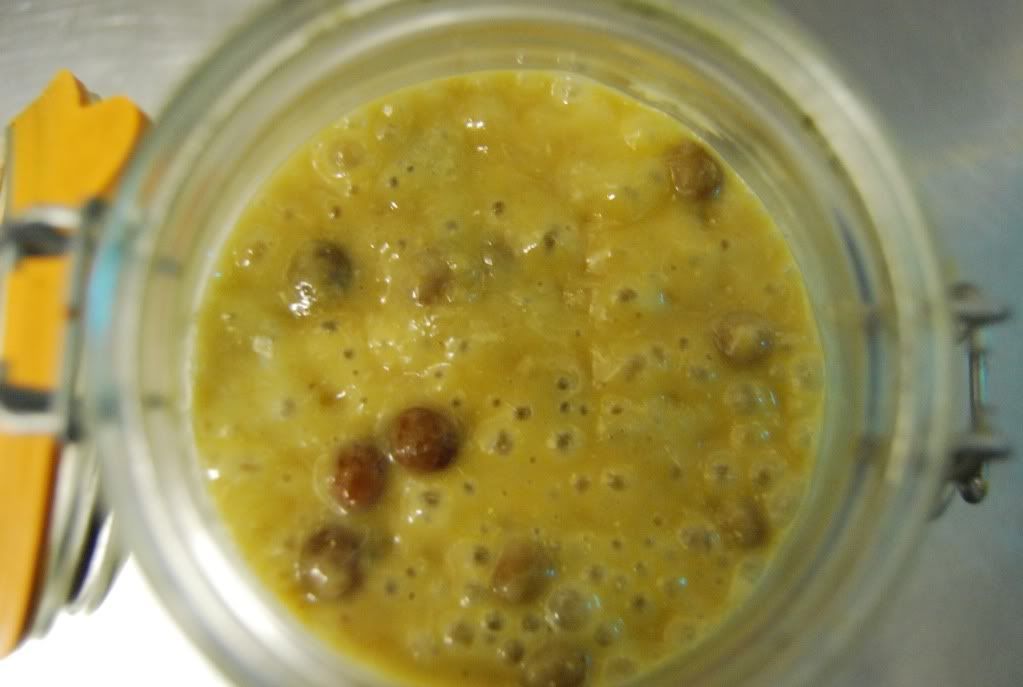
As follows are the Dan Lepard instructions from ‘The Handmade Loaf’, but using nettles instead of raisins. Of course you can also make the loaf with whatever leaven you have on the go.

Day 1:
50g room temperature water
2 big tsp rye flour
2 big tsp strong white flour
2 big tsp natural yogurt
3 heads of nettles with flowers

Combine in a kilner jar and leave at room temperature for 24 hours.

Day 2:
50g room temperature water
2 big tsp rye flour
2 big tsp strong white flour

Add the above ingredients to the jar, water first, and thoroughly combine. Leave at room temperature for 24 hours.

Day 3:
100g room temperature water
 4 big tsp rye flour
4 big tsp strong white flour

Add the above ingredients to the jar, water first, and thoroughly combine. Leave at room temperature for 24 hours.

Day 4:
100g room temperature water
125g strong white flour

Discard ¾ of the contents of the jar. Stir in the water. Strain the mixture to remove the nettles. Add the flour and place back in a clean kilner jar for 24 hours.

Day 5:
100g room temperature water
125g strong white flour

Discard ¾ of the contents of the jar. Stir in the water and then add the flour. Leave for 24 hours more, then your leaven is finally ready to use.

The Loaf

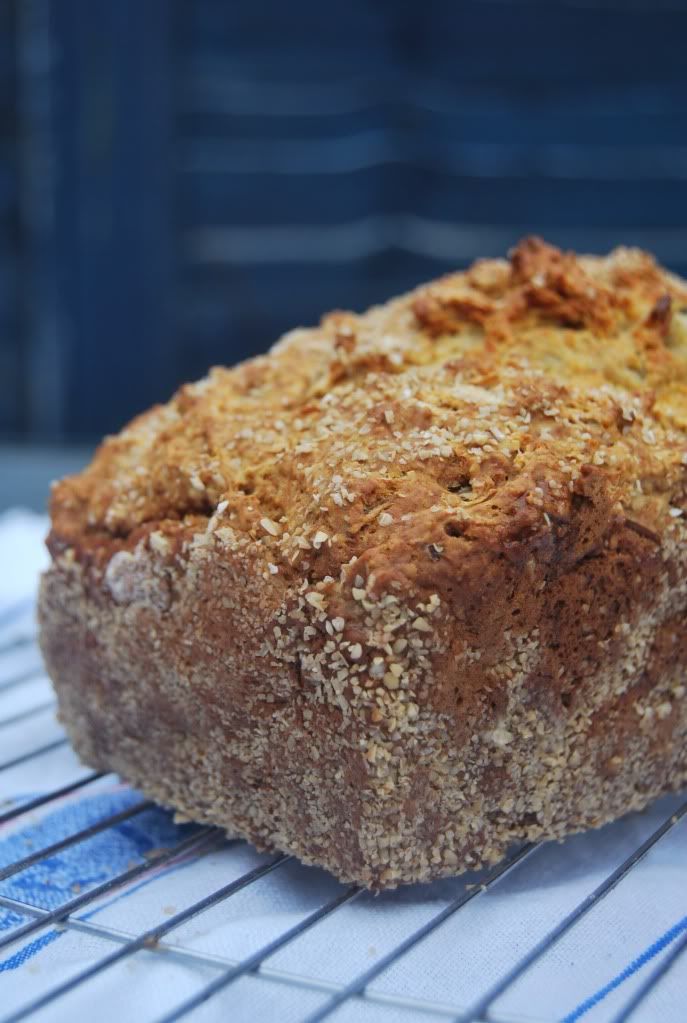
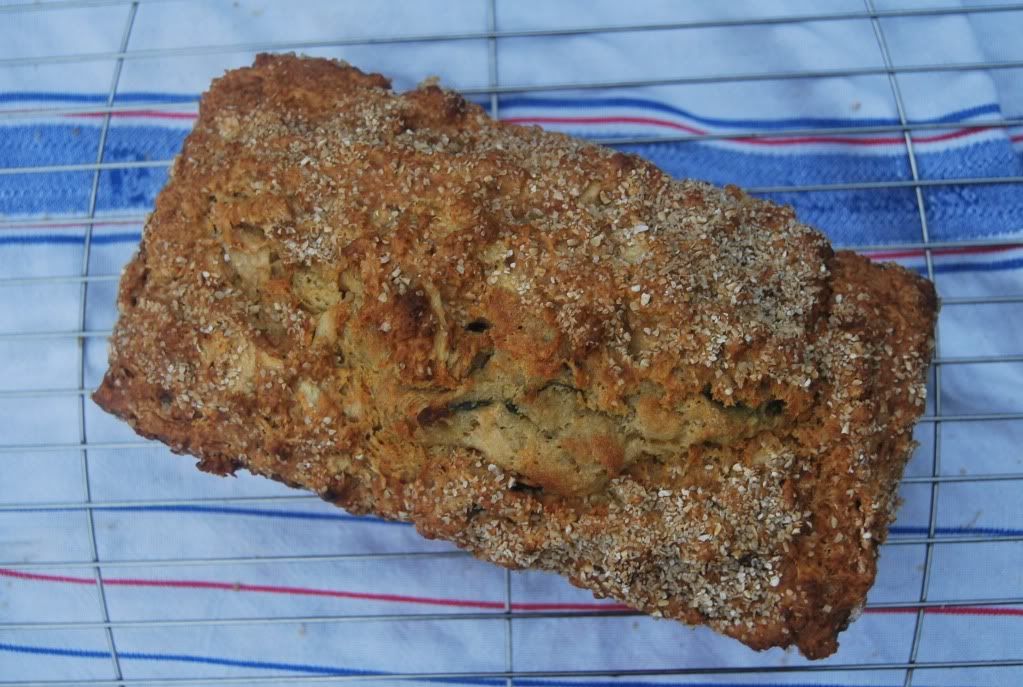
500 strong white flour
1 ½ tsp sea salt
60g nettles, blanched and chopped
150g nettle wheat leaven
250 ml water, room temperature

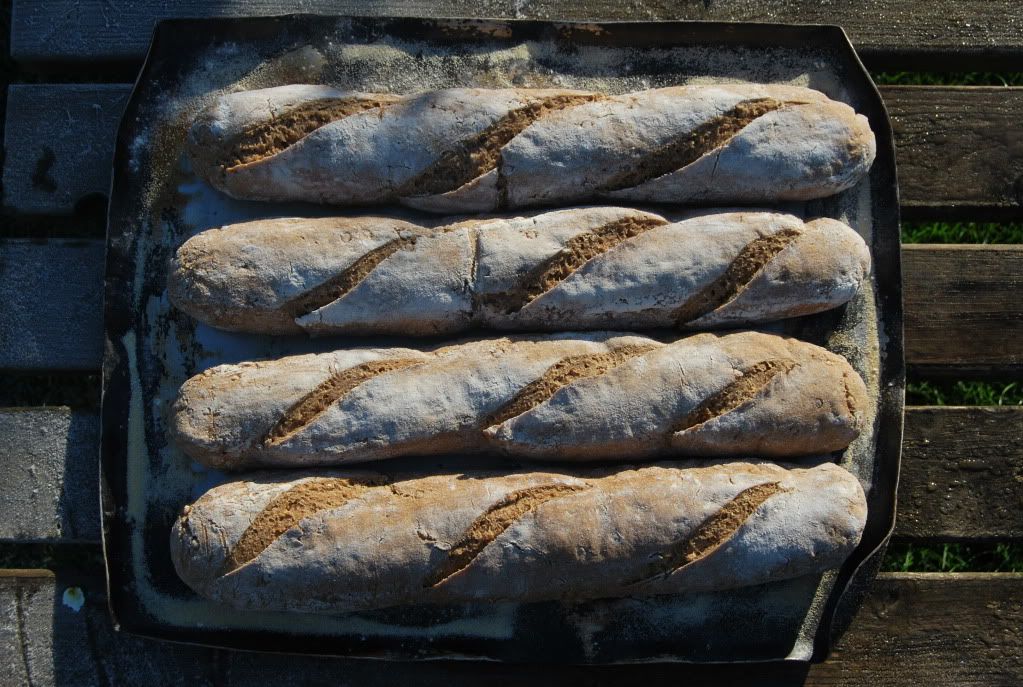
In a large bowl combine the flour and salt. In another whisk together the leaven and water, then stir in the nettles. Mix the wet ingredients into the dry and leave for 10 minutes. Turn out onto an oiled surface and knead for 10 seconds, ending with the dough in a ball. Cover with the upturned bowl and leave for 10 minutes. Repeat the 10 minute kneads thrice more, then knead again after 30 minutes and after an hour or two. Leave for another hour before kneading one last time, and shaping the dough into a ball. Dust a tea towel liberally with flour, and use it to line a large Pyrex bowl. Place the dough in, seam side up, cover and leave for between 5 and 8 hours in a cool place. After this time, dust a baking tray with semolina, and upturn the bowl onto it. Peel the tea towel carefully away from the dough, and bake the loaf for 40 minutes at 200˚c. Leave to cool before slicing. This loaf should keep well for up to 5 days.


Tuesday 9 November 2010

Apple Soda Bread


This week I’ve been stocking up the store cupboard ready for the winter months. I’ve had vats of chestnut jam and rosehip syrup on the boil, both of which are now waiting in neatly-labelled kilner jars to be transformed into a component of some dessert. I love the idea of preserving ingredients and making them last all winter the way that people used to, before we started ignoring the seasons in the name of convenience. The intelligent and co-operative way we used to regard seasonality is apparent in the three apple trees clustered in the Pot Kiln garden. As different varieties they bear fruit in turn, one by one, meaning we have a constant yield from the beginning of August right through until November. When I first noticed this, I was struck at the good sense and forethought of those who created the garden from which I take my produce. The thought of these apples inspired my loaf this week.

Apple Soda Bread

I must confess I’m rather hesitant to send non-yeasted loaves out to the restaurant, for fear it looks lazy or as if I’ve overslept and run out of time. However, the crumbly density and almost creamy flavour of freshly made soda bread can make a pleasant change; and spread with cold, salty butter is enough to make me overcome my prejudice.

300g strong white flour
25g oat bran
1tsp sea salt
2 tsp baking powder
1 apple, grated
30g butter, melted
150ml whole milk
150ml plain fromage frais

extra oat bran for dusting

Butter a 2lb loaf tin and dust the sides and base with oat bran. Whisk together the milk and fromage frais. Add the grated apple and butter. Combine the dry ingredients in a large bowl. Using a spoon, stir in the wet mixture until well combined. Scrape into the loaf tin and gently flatten with a wet hand. Sprinkle more oat bran on the top. Bake for 20 minutes at 200◦c, cover with foil and bake for 30 minutes more at 180◦c. As when baking a cake, a skewer should come out clean when slid into the centre of the loaf. Leave for 5 minutes before removing from the tin. Cool on a wire rack and eat the same day.

Tuesday 2 November 2010

Swedish Cinnamon Buns

Makes 30


Aside from the mighty Dan Lepard, there is one other figure who has influenced my desire to bake over the years: my flamingo-haired, copiously-bangled auntie Sue. In her modesty she will deny this, but having lived in Stockholm for over 30 years, Sue has developed a significant understanding of Scandinavian ingredients, flavours and baking traditions. Sue has spent many hours painstakingly translating recipes into English for me, and every time I’m in Sweden loads me up with brown paper-packaged flours and grains which are impossible to find here. On visiting her family apartment I always like to guess what treats will be inside the Christmas-themed tins stacked in the kitchen. Saffron bread, dark and light rye sourdoughs, rusks, pepper biscuits, and almond fingers have all delighted me on past occasions, ensuring I return home decidedly heavier. So, whilst she is currently in England on holiday, I thought it would be the perfect time for a master class in that most iconic of Swedish breads; the cinnamon bun. I’ve added orange zest to the dough here for an extra layer of flavour, but it's by no means essential.

For the dough:
100g unsalted butter
500ml milk
50g fresh yeast, or 28g dried
900g strong white flour
1 egg
½ tsp sea salt
100g caster sugar
zest of 2 oranges
1tsp ground cardamom

For the filling:
150g softened butter
4 tbsp caster sugar
4tsp cinnamon

To glaze:
1 beaten egg

30 muffin cases

Melt the butter in a small saucepan, add the milk and bring up to body temperature, around 37◦c. Put the yeast in a large bowl, and whisk in the milk mixture until the yeast is dissolved. Add the egg, salt, sugar and flavourings, then stir in the flour using your hands. Turn out onto a floured work surface and knead for 5 minutes until the surface is smooth and shiny. Return to the bowl and leave to prove in a warmish place for around 45 minutes, or until doubled in size. Knock the dough back, and cut into two. Return one piece to the bowl, and roll the other out into a large rectangle, around ½ a centimetre thick. For the filling spread the dough evenly with half the softened butter, then sprinkle over half the sugar and half the cinnamon. There are a myriad of ways in which these buns can be shaped, but the most basic is achieved simply by rolling up the rectangle and slicing into 4cm rounds, as for Chelsea buns. Each one is then laid in a muffin case, and pressed down slightly. See bottom right.   


The second way of shaping looks more ornate, but is still easy to achieve. After smothering the rectangle with filling, fold it in half top to bottom, to create a narrower rectangle. Cut slices from this rectangle about 4cm wide, and create an incision in each slice from the bottom nearly up to the top, creating two legs of dough, as in the diagram. Twist these legs together, and fold the untwisted top part underneath, so it is at the bottom when you place the bun in the muffin case, as in the photograph above left.

Leave the buns to prove again in a warm place for 30 minutes. Glaze with the beaten egg, and sprinkle over traditionally Swedish pearl sugar if available, or granulated sugar if not. Bake at 200◦c for 15 minutes. Enjoy with a cup of afternoon tea.


An alternative and rather impressive way of shaping the dough is into a couple of wreathes. Divide into 2, roll out and spread with filling as with the buns. Roll up into tight cylinder, and place on a tray lined with baking parchment. With a pair of sharp kitchen scissors, make deep incisions at regular intervals all the way along the top of the roll. Starting at one end, pull one flap one way, the next one the next, going in alternate directions all the way along, and exposing tantalising layers of cinnamon and sugar. Prove, glaze and bake the same as the buns.


Tuesday 26 October 2010

Maple and Hazelnut Loaves


Makes 4 loaves

The greatest challenge posed by the making of this loaf is not to eat the sweet, grainy puree by the spoonful before it even touches a grain of flour. Apart from that, it’s simple really. I am dying to incorporate this puree into a praline ice cream, or use it as a filling for alternative Chelsea buns. My thanks to Annie this week, for allowing her be-wellied feet to be photographed on an impromptu and rather giggly bread shoot.

For the hazelnut puree:
300g hazelnuts
100g salted butter, melted
150g maple syrup
50ml double cream

For the dough:
1.4ltr tepid water
50g fresh yeast, or 28g of dried
3tbsp sea salt
2kg strong white flour

For the crust:
200g hazelnuts
a little milk

Pulse the 200g of hazelnuts for the crust in a food processor until very roughly chopped. Tip out and set aside. Add all of the puree ingredients to the processor and blitz to a course paste. Dissolve the yeast in the water and then whisk in the puree. In a large bowl combine the salt and flour, then add the wet ingredients to the dry. Mix to a rough dough, cover and leave for 10 minutes. Knead lightly on an oiled work surface, ending with the dough in a smooth ball. Leave for another ten minutes then knead. Repeat this process. Leave for 1 hour. Divide the dough into 4 pieces, and shape each individual piece into a ball. Cover and leave for 10 minutes.

Lay a clean tea-towel flat on the work surface and spread the remaining 200g of crushed hazelnuts onto it. Take one ball of dough, and seam side up, flatten slightly. Fold the top edge down into the centre, and the bottom edge up to meet it. Lightly roll until the correct length for your 2lb loaf tins. Pick the loaf up gently by the under-seam, and turn over so the smooth top side is exposed. Brush evenly all over with a little milk, then roll back and forth across the tea-towel until well-covered with hazelnuts. Place in a buttered tin. Repeat with the rest of the loaves. Leave for 30 minutes in a warm place. Bake at 200˚c for 15 minutes, then 180˚c for 45 minutes. Keep a look out in case the hazelnuts on top start to darken too much; if this happens, just cover the loaf with some foil and continue baking. Leave for an hour before slicing.


N.B. Because this is a well-yeasted, reliable dough, if more convenient you can forget about the kneading times above, and replace with an initial 5 minute knead. After leaving for 1 hour, knock back and shape, then prove for 30 minutes as above.

Tuesday 19 October 2010

Cider Barm Bread


Went foraging for the last few blackberries yesterday afternoon, accompanied by a very determined Dan. They are scarce to say the least now, as the October chill fills the air, but we heroically rose to the challenge; scouring the tops of hedgerows on tip toes, fearlessly battling nettles and brambles with freezing fingers and stinging wrists, all in pursuit of these shining, jet black jewels. It was a risky business, but one which will hopefully be appreciated by those who order the pannacotta with steeped wild blackberries.

My loaf this week is the one I have been most excited about, purely because it started life as a kind of science experiment, and I really wasn’t sure if it would work let alone taste good. I have made bread using a beer barm before, allowing beer and flour to ferment and create a natural leaven. However, as a dedicated cider drinker, I wanted to see if I could do the same with my beverage of choice. At the Pot Kiln we don’t have any ‘dirty’ ciders, and by that I mean proper, thick, sedimenty scrumpy, so hedging my bets and using our cider on tap, I added raisins to the mix. My hope was that the small amount of yeast on their surface would kick-start the fermentation process. After the barm was made, (and had suffered dubious looks from those sceptics who witnessed the stodgey mass being plonked into a kilner jar), it was put behind the bar, out of the kitchen heat. After a couple of days of hopeful check-ups, my patience paid off; bubbles began to appear and the volume increase, just like a beer barm.
The loaf itself is naturally leavened, which means it contains no added yeast whatsoever, and rises only because of the natural yeasts in the other ingredients. This means it needs a comparatively long time to prove even after the barm is ready, but the flavour is unsurpassable and you’ll find it keeps for much longer.

The Barm
1pt cider, preferably English
200g raisins, preferably organic
80g strong white flour
3tbsp leaven (I used rye)

The Bread
1.2 ltr ambient water
2kg strong white flour
8tsp sea salt

Heat the cider and raisins in a pan up to 70˚c (any more will kill the natural yeast). Take off the heat and add the flour in a steady stream, whisking all the time. It will go lumpy no matter what, just make sure the lumps aren’t too big. Leave to come back to room temperature, around 20˚c, then stir in the leaven. Pour into a sealable jar, and leave at room temperature, out of draught and hot air currents, for no less than 48 hours, until the volume has increased and bubbles are breaking the surface. If it needs 12 or 24 hours more then just give it time. It should look like the photograph below.


When ready, pour the entire contents of the jar into a large bowl. Whisk in the water. Mix the flour and salt, then add to wet ingredients and combine. Leave for 10 minutes. Turn out onto an oiled surface and knead briefly, ending with the dough in a ball. This is another wet dough, so a dough scraper is useful at this point. Cover with the upturned bowl and leave for 10 minutes. Repeat the kneading process, leave for another 10 minutes and knead again. Leave for half an hour or so and knead again, by which time the dough should be a lot more manageable. Now knead and leave for an hour. Then divide the dough into 4, shape into balls and place on separate semolina-dusted trays, leaving ample room for expansion. The dough should hold its shape well at this stage, and stand proudly. Cover with tea towels and leave for between 5 and 8 hours, depending on your schedule. I leave mine overnight in the coolest part of the kitchen, but a pantry would also be good. Natural leavens tend not to like the warmer places you might usually prove bread, such as airing cupboards or agas.
 The next morning, or after the long prove, spritz the loaves with water and bake at 220˚c for 15 minutes, then 200˚c for 45 minutes. The loaves should be golden all over and feel light when lifted. The texture should have great deep holes and spring back to form even when pressed hard.


A word on kneading....

This kneading schedule is only a guide and of course is not always possible if you want to have a life as well as bake a loaf of bread. The basic idea is short kneads (I aim for 5 or 6) occurring frequently at first then at steeply increasing increments, instead of one simple knocking back. It is less labour-intensive, and good if you can be in the kitchen all day, but does take a long period of time overall. Just fit the loaf around you, and if you need to leave it longer, regulate proving though temperature and place the dough somewhere cooler. As Dan Lepard says, ‘All breads can only be made if they suit the time you have available, whether in a bakery or in your home’.

Saturday 9 October 2010

Apricot and Oat Loaves


Since my last post the gentle grip of autumn has been steadily encroaching on the Pot Kiln and its garden. In a flurry of russet and deep purple (and with increasingly stained fingertips), I have been digging summer-sweetened beetroot, picking the remaining plums from our prolific tree, and gladly hoarding donated damsons. The beetroot, cubed and pickled in balsamic vinegar and red wine, serves as a vivid, earthy accompaniment to terrines and cold meats. The plums and damsons are both cooked down and pureed; the former to feature in a plum ripple ice cream for our irresistibly kitsch sundae, and the latter finding a more grown-up fate, as elegant cubes of firm jelly upon the cheeseboard.
There is change afoot not only in the weather but within the kitchen walls too, with the news that Dan, our talented sous chef, is leaving in a few short weeks. Dan has been my mentor in all things pastry-related; has tolerated my constant questioning and aided me translating my ideas onto the plate. He is moving to his Dad’s place, the Royal Oak at Eccinswell, where I know he will soar.

With the cooling climate and misty mornings, my annual porridge craving has returned, as is inevitable. There is something soothing about the aroma of hot oats, and with porridge on my mind I’ve decided to post this simple, homely loaf. The oats make for a spongy, slightly open crumb, and an almost creamy taste – perfect toasted and drenched in melting butter.

Apricot and Oat Loaves

Makes 4 loaves

100g jumbo oats
300g dried apricots in ½ cm dice
400ml boiling water

1kg strong white flour
1kg wholemeal flour
3 tbsp sea salt
3tbsp honey
2 tbsp fresh yeast (or 28g dried yeast)
1.4 ltr water at room temperature

Combine the oats and apricot pieces in a large bowl and pour over the boiling water. Leave for 15 minutes for the water to be absorbed and to cool down. Whisk in the honey, remaining water and then yeast, until evenly combined. Mix together the flours and salt, and add to the wet ingredients. Roughly combine into a sticky dough, cover with a cloth and leave for 10 minutes.

 Turn out onto a lightly oiled surface and knead for a minute or so with oiled hands until a ball is formed with a taut surface. It is a wet dough, so I find using a dough scraper helps greatly. Return to a clean bowl, cover and leave to prove in a warm place for 1 hour. Turn the dough out again, and divide into 4 pieces. One by one, knead each piece, bringing dough from the outside into the middle, turning the mass 45˚ each time you do this. Once in a ball and with the seam side facing you, flatten slightly and fold the top edge down into the centre, and the bottom edge up to meet it. Lightly roll then place in oiled loaf tins, with the seam at the bottom.

Leave to prove again for half an hour. Bake at 220˚c for 50 minutes. Remove from the tins and return to the oven for a further 5 minutes. The dough should sound hollow and be coloured all over. Leave to firm up for at least an hour before slicing.

Sunday 26 September 2010

Brick Kiln Sourdough

I brought my faithful rye starter to the pub with me (made according to instructions in Dan Lepard’s inimitable ‘The Handmade Loaf’), and like to use it in the restaurant bread as it gives a depth of flavour that cannot be achieved with just added (and comparatively expensive) ingredients . It was an easy decision to make this the first recipe in the blog since it uses our bespoke ale, Brick Kiln from the West Berkshire Brewery. I wanted to make a loaf including it which echoed The Pot Kiln in rustic appeal, but of course the Brick Kiln can be substituted for any worthy real ale which isn’t too pale. The hoppy tang really compliments the sourness from the starter and the fragrant nuttiness of the rye, and makes the bread taste how I imagine it would’ve used to centuries ago.

This loaf need to be started the day before to allow the ale and grains to get acquainted overnight.

Makes 2 big loaves.

300g whole spelt
700ml water
1pt Brick Kiln

In a heavy based saucepan, bring water and spelt up to the boil and cook on a subtle simmer for 40 minutes until the gain is cooked, or until the water is all absorbed. Take off the heat, place in a container with the ale. Cover and leave overnight unrefrigerated.

750g light rye flour
250g strong white flour
250g wholemeal
2tbsp sea salt

500g rye sourdough
30g fresh yeast
100ml ambient water
2tbsp malt extract

The following morning combine the flours and salt in a large bowl. Mix the other ingredients with the grain and ale, then add to the dry ingredients. Combine to form a sticky dough. Cover and leave for 10 minutes. Turn out onto a lightly oiled surface, knead briefly for a minute until the dough forms a ball. Cover and leave for 10 minutes. Knead briefly again in around 10 movements, ending with the dough in a ball. Cover and leave for 10 minutes. Repeat the kneading process. Leave for an hour then repeat the kneading process. I will discuss this course of action at length in another post, but it can be made more flexible when other factors such as temperature are taken into account.
Leave for a couple of hours, then cut the dough in half and shape. I always think a ring looks impressive on a bread board and yields neat little wedges when cut. After shaping and placing on trays or in proving baskets, leave the dough covered for at least 5 hours, or at a cooler temperature for longer if it suits. If you want to slash the dough before baking, do so then leave for 10 minutes before placing in the oven as I’ve found this makes the rise more prominent with a sourdough (I haven't done this in the picture below). Bake at 200˚c for an hour, turning down the oven to 180˚c if the top is looking too brown. Enjoy with a hard cheese and sweetish chutney.


Behind the blog


This is the Pot Kiln, a red-brick, wooden-floored embodiment of everything a rural English pub should be. It is the centre of the community, rooted in its West Berkshire surroundings; and the food served here is a succinct reflection of this. It is a place where locals turn up for a pint and hand over freshly caught brown trout, or earthy ceps in wicker baskets plucked from nearby secret locations. It is a place where the ale of choice, Brick Kiln, is brewed especially for us a mile down the road, and the venison around which the menu centres is stalked by the owner, Mr. Mike Robinson himself. It is a place where the chefs are to be found precariously stanced up apple and plum trees, making use of the latest glut from the well-established kitchen garden, if not scouring the hedgerows on blackberry duty.

It is also my new home, where I’ve begun life as a pastry chef. A year after graduating from Oxford, I have swapped a weighty obligatory bookshelf of Alexander Pope and Mary Wollstonecraft, in whose company I never felt quite at ease, for a scant selection of Dan Lepard and River Cottage. Cooking has always been a huge part of my life (at primary school I would beg the dinner lady for her quiche recipe), but this is my first foray into the daunting world of the professional kitchen. I am therefore relatively inexperienced, but like to reassure myself that enthusiasm counts almost as much as practice. One task I have been given sole charge of at the Pot Kiln is to keep the restaurant supplied daily with freshly baked bread. My brief is simple:  4 loaves of white, 4 loaves of brown, to be sitting proudly on the scarred oak bread board by , and the rest is left to me.

It is the task of assembling and baking this dough that my blog will focus on, as the combination of water, flour, salt and yeast, with its infinite potential and promise, captivated me long before I had paying customers to consider. It’s a running joke that my movements can be tracked by the trail of flour I leave in my wake, and before moving out I exacerbated my mum by filling our modest dining room with 25kg sacks of rye. I love that such humble beginnings, given time and care, will produce something sustaining and with a depth of flavour hard to conceive looking at the raw ingredients. No two loaves can ever be the same when made by hand, so each creation is unique. I hope that the recipes I share will be a reflection of my passion, and of how much I am learning along my journey.